Help notes and articles you can find on this page:
|
|
To Come:
Juliette & Sita's School of Pole Dancing fervently advocates and endorses Free Access to Open Source Information. Knowledge is power and it expressly stated in our Mission Statement that we are concerned with empowering our students, however...if we help others by compiling and making available this information, we shall be very happy for that indeed! The below listed, forthcoming articles are being compiled because this information regarding Pole Dancing related issues is not available anywhere. And because we have amongst us individuals who have experiential knowledge of these topics. We hope they will be meaningful to all who need them or wish to broaden their understanding of this discipline.
|
|
Overcoming Difficulties with Moves

- Beginner, Intermediate, Advanced & Professional (Please Note: This article is a Work in Progress)
If you've just started out, chances are you need to develop a specific strength or co-ordination...although, admittedly, what might be holding you back might be a more psychological issue. If it's confidence, the best way you'll fix that is to keep coming to classes. There's a certain magic to the pole that inspires this in practitioners of our art...and it's well documented! If it's “Pole Separation Anxiety”, that's another story. Just keep watching this space because we'll be creating some documentation of our own as to how this problem can be overcome in due course. Meanwhile, if you're keen to keep climbing up the ranks, it's best to buffer your classes with a personal exercise regime at home. Just look up the moves you're having difficulty with on these handy lists, divided into Beginner, Intermediate, Advanced and Professional (includes Recoveries and Flourishes) and check which area you'll need to focus more on when running your routines at home over the week before coming to class...it will speed up your advance rate like a charm! Beginner Moves * Basic Instinct * (as basic as it gets) – Arm strength and a decent grip. Push-ups for you! And find a stress ball to squeeze under your office desk or at lectures. * Showgirl * (spin with pole proximity) – Keep at the push-ups for arm strength and get in some extra legwork for your kick off and ability to hold your legs in position. A few extra thigh pulses from second position can go a long way. And be sure to do any spilt-orientated stretches! * Nun * (spin with distance) – Leg strength and leg co-ordination for your kick-off are key. Thereafter, it's all up to your arms. You want the strength for holding your weight as well as for controlling your body's proximity to the pole as well as the perfected grip for a controlled slide (not too fast, not too slow). Good ol' push-ups and more thigh pulses for you, stretching your legs for a good kick-off is always a good idea too. * Mon Cherí * (aka The Pole Dancer's Bow) – Leg strength and balance. Add extra thigh pulses to your routine and run through The Candle yoga routine to counts of 10 atleast. * Peacock * (recovery move from squatting) – hip and pelvic work. Work on gyrating just a little wider when you're dancing at home or at the club. Any stretches involving the waistline is a bonus too, like the side-to-side elbow swings with the locked hips. *Class Act * (recovery move from sitting position...Remember ladies, it's supposed to be handless!) – Leg strength and balance. Add extra thigh pulses to your routine and run through The Candle yoga routine to counts of 10 atleast. Intermediate Moves * Cowgirl * (combination low spin, directional change) - Legwork is probably throwing you off. Hit the dance floor more often when you go to a club! This move includes change in momentum too which, when perfected, is so much fun! But you'll need to be able to not get dizzy or it will be hard to recover from. Practice your pirouettes! * Saint * (*Nun* with *Reverse Showgirl* conversion) – If you're struggling with this classy combo, it's probably co-ordination and momentum work getting in your way. You've obviously achieved the pole moves necessary to perform this number...but you're presumably still very new to this discipline of dance. You're going to need to get more comfortable with the very new way in which your body moves when having to dance with centrifugal force, that is to say you need to build more understanding in your body as to the way it moves and swings when on a dance pole. Run through every single move in your repertoire every chance you get to build the confidence and physical intelligence that will get you your Breakthrough Moment for this one. * Reverse Nun * (spin with back to the pole) – Legwork is probably throwing you off. Hit the dance floor more often when you go to a club! Arm stretches that pull the shoulders back will help too with perfecting the reach for this move. * Spotlight * (one-armed spin) – Arm strength, hit the push ups! Arm strength (as well as co-ordinated legwork) becomes increasingly important at the Intermediate level, so better get it down. * Idol * (combination high spin with directional change) – Co-ords, co-ords, co-ords! Also arm strength for the two grips in this one and leg strength for the kick-off. If you can't kick yourself off high enough, it's not going to work out. Work those thigh pulses! This is also one of the essential bridge moves to the Ice Skater. * Moulin Rouge * (jump with pole stasis) – Thigh and arm strength are pivotal if you want to get this stylish move right. It is especially important to master thigh grips to get to the advanced moves – handless inverts and the like. Aim for a higher count of thigh pulses from second position in your general fitness regime, a must along with the push-ups. If you don't get the reversed spin from extending the left leg for the finish, then leg flexibility is thwarting you. It's the act of fully crossing it over your right that gives this extension the effect. When sitting at your desk at work or at home, try crossing your legs double (with ankle wrap) with left over right. * Fledgling * (spin with horizontal tilt and body wrap) – Arm strength may help you out for this one, but at the end of the day, to perfect this move, you need core, core, core. So pile on the ab pulses into your personal fitness regime. Throwing in extra push-ups won't hurt either. The sooner you ace this move, the sooner you'll be inverting. Also, getting used to the unusual pole contact in this move will serve you very well when progressing to some very Advanced grips to come after mastering all the Goddess Grips. * Flying Fledgling * (*Fledgling* with *Reverse Starfish* conversion) – Same as above, but even heavier on the core. Also, if you want this one to be flawless you had better be relentlessly conscious of not bending your knees during any of the usual stretches (ie Toe Touch, Dog Stretch, the entirety of the Candle Routine - barring the one position, etc). Having your hamstrings properly stretched not only perfects the move, but also ensures your core is getting the proper workout it will need to take you to Advanced level * Hello There Boys * (wrist-sit slide with lean) – Core and arms. Work those sit-ups and go an extra mile with your push-ups. Helps to get comfortable working with heights too. If you are prone to vertigo, don't worry, this one is really safe and quite a breeze once you have overcome your fear. It's also one of the essential bridge moves to the Fallen Angel. * Sitting Pretty * (handless Pole Sit) – You need to be pulling your *Moulin Rouge*s and *Hello There Boys*s without hesitation, not to mention with the acquired resilience to the pole burn on your thighs that would come from these practices, in order to attempt this move. As with the *Moulin Rouge*, higher thigh pulse counts will help, however, your thigh strength will be useless if the skin in that area hasn't adapted to the frictional pull. So practice, practice, practice whenever you can! * Gemini * (invert with calf grip) – Your leg-strength will give you the kick-off and your arm strength will certainly be a useful buffer for it, but these things will not get you the full invert. Your core strength does that job and you get added support by using your calf grip to pull into position fully ...however, be wary that you don't sustain the core crunch once you're over, you need an arched back for proper position and to be able to convert this trick to the J & S or the Butterfly. Your core doesn't keep you inverted and prevent you from sliding, your hands and calf grip will do that for you and keep you safe. * Worshipper * (recovery move from kneeling position with spin and legwork) – thigh and leg strength and co-ordination will get this one down. Work on a high thigh pulse count from second position. * Disco Queen * (recovery move from third sitting position with momentum, balance and legwork) Thigh strength is important to get enough of a high momentum spin when kicking out, so practice getting a higher count of thigh pulses from second position. It is also impossible to do this trick if you have no balance (no arm or leg support in this move) and get disorientated from spins. Hit the pirouettes and run an extra couple rounds of the yoga Candle routine. * Can't Touch This * (half-bridge recovery) – Core, core, core! Push for higher counts of the ab pulses. A bit of thigh strength is a good buffer for this move too, so feel free to throw in extra thigh pulses too. * Harlyquin * (Tight spin Cowgirl with extended leg finish) – Arm strength will give you the proximity you need to pull this combination spin with it's stylish end flourish. Otherwise, if the legwork is still throwing you, focus more on elaborate dance steps to a high speed song when you're hitting the dance floor of your favourite club. * DJ * (pirouettes around pole with alternating hand grips) – Co-ords and controlled response to disorientation and high-momentum spins Advanced Moves At this level, you've obviously, by now, developed the necessary strengths and proficiencies – that is to say, you've got decent flexibility, balance, stamina as well as core, arm and leg strength. Other indisputable markers that you are a certifiable Advanced student now will be a proliferation of bruises (consult your Pole Bruise Charts) and some respectable calluses on your hands, at the mounds where your palm meets your fingers. Congratulations! At this stage in your training, the trick to mastering a lot of the Advanced Moves is not so much working on your skills and proficiencies as it is on honing and perfecting them. You can do The Bridge? Great. Now see how high you can arch your back. Push yourself and keep pushing yourself. Now see if you can go into a Half Bridge from a standing position and recover. Is your Virgo looking good? Now push it for a split. That kind of stuff. If you struggle with any of these moves you're just going to have to practice, practice, practice until you hit your Breakthrough Moment. You know what I'm talking about. Another significant change at this level is that you should start getting creative and inventive with the knowledge and experience you already have. If you are often playful on the pole outside of class time, you're definitely packing (or are about to be receiving) your Advanced Certificate :-) * Ice Skater * (combination one-arm high spin, directional change and co-ordinated legwork) – Run through the breakdown in your mind and put it to practice. If it helps, hang-off the pole and actually run-through the stages of legwork. By now, you really must start getting comfortable holding all your weight and balance using only one section of your body, in this particular case, your dominant arm. * Ballerina * (combination one-arm low spin, directional change and sustained legwork) – Once you've got down your Ice Skater this one should a breeze for you. Just remember to watch for and be comfortable with keeping your legs outstretched and away from the pole on the spin, something the body is generally disinclined to. Also get used to having your scapula in contact with the pole for spin control too – this kind of contact will be prevalent at Professional level when running shoulder mounts (as opposed to jump or hand mounts). * Trinity * (triple combination spin with high momentum and co-ordinated legwork) – Three different stages of leg and hand contact with the pole while shifting through the spin stages in this number. Your momentum changes three times in unusual ways as well. Run through the breakdown and be wary of the various ways your arms and legs need to work throughout the spin. Consider yourself a Queen of Co-ordination if you pick this one up quickly – there's no dance floor in the world you can't break it down on! * Virgo * (invert with open V) – Core, core, core! As with your *Gemini*, leg and arm strength will get you up...but not over. You'll need to do at least 20 ab pulses a turn, to forward and to left and right, to take this one on, especially as you don't have a calf grip to help you out any more. Furthermore, balance for staying upside down in this position is essential, best perfect your Candle yoga routine. * Serpentine * (hanging backward spin slide) – Ye olde leg and arm strength and co-ords. Push the lot of them, if you've mastered The Idol and Ice Skater, you can do this. Just...(deep breath) practice, practice, practice! * Extended Butterfly * (Combination invert with body extension) – Think of it as a glorified and lengthy elaboration on the Gemini, but with more emphasis on arm strength. Also, you'll need the confidence of a veteran inverter (don't push for this move unless you've been confidently inverting, even without an instructor present, for at least a month) as well as a good sense of timing and weight-shifting when it comes to working the co-ords for this move – those two aspects are key, get in a more intensive yoga routine and push for more push-ups. *Juliette & Sita (aka the J&S)* (combination, sustained invert, with spinning open-v slide finish) – Run through the breakdown (*Virgo* to *Gemini* to *Extended Butterfly* to spinning *Butterfly* finish) and practice, practice, practice. Also be sure to throw extra Bridges and Diamond Dog jumps in your exercise routine. * Fallen Angel * (Handless invert with thigh grip) – If you're not getting this (you've definitely got the core strength by now) you've been avoiding your Sitting Pretty Bruises (check your bruise chart), take yourself back a notch and run through your Moulin Rouges till you can do it handless. When you can do that, plank it. Play with it until your thighs adjust accordingly. You'll know when you're ready when they stop hurting as much as they used to. If fear and disorientation are what's derailing you just practice doing relatively prolonged headstands at home (and practice flipping over into a stand from them too for the Fallen Angel landing). * Mermaid * (standard pole climb) – Calluses and increased resilience to leg and calf pain will see you getting this climb effortlessly. Unfortunately, there's very little you can throw into your personal exercise regime at this point to assist with achieving your Breakthrough Moment for this move, you need a dance pole. So practice your Sitting Pretty's, any Goddess Grips you can do and Pole Hangs (or good old *Spotlights* alternating L and R arms) every chance you can get your hands on one. * Flying Angel * (Sustained invert with co-ordinated legwork) – Confidence, balance, enhanced arm strength and co-ordination are absolutely key to make this elaborate version of the Fallen Angel work. Keep at the headstands, but do them for longer, then work on maintaining that balance while shifting one leg position at a time (for example, while balancing off the wall with your non-dominant leg, try bending the dominant one so your knee juts out, then straighten and swap). * Isis * (Handless arabesque on pole with calf grip) – Like with the Fallen Angel breakthrough, you'll need to adapt your calf's resilience to pain. This one is particularly rough in that regard I'm afraid, weighting yourself against the pole before hanging is pivotal too, all the headstands you've been doing should pay off for these new adjustments in your trick routine for this move. * Inanna * (Handless horizontal kneel off pole) – You are strongly advised not to attempt this move unless you can perform the Isis confidently and effortlessly. The new work here is, surprisingly, not as core-related as one might think, rather a development of the calf grip and an understanding of how to manage your weight with tension – good old physics. You will need to adapt to the pain on your right shin as well. Then just keep at it till it finally falls into place. Consider yourself forewarned this move is a whole new level of pain! Although the Break Through Moment for this one, by the by, is quite the thrill! *Cupid's Bow * (Sustained invert with legwork) – Don't try this unless you've perfected your Butterfly and your Flying Angel. It's much harder than it looks. Balance, confidence and co-ordination need to be your provinces and be sure your arms aren't feeling weak at the time or you're in trouble. Pile on some calluses and push-ups. * Orbitter * (Launch into invert from pole hang) – If you've got the legwork down for the Flying Angel and are comfortable for the flip work the original Fallen Angel, you're ready for this one. This one is very dependant on leg and core strength (you won't be able to pull it off if you've burnt out your core duriArm strength will come into play as well. A good sense of balance combined with confidence in vertical (as opposed to horizontal) swings seals the deal. Then practice, practice, practice till you hit that sweet, sweet Breakthrough Moment. * Zero Gravity * (Invert with air walk) – Flat-out core and arm strength, although flexibilty for the grip comes into play too. This move should not be attempted unless you've been confidently performing the *Cupid's Bow* for a about a month, with, of course, a position maintained higher up the pole than when you first accomplished it. * Persephone * (handless invert with calf grip) – The last of the “Goddess Grips”, as with the Isis and Inanna, you just need to practice patience with this one till your sense of this version of a calf grip and the management of the unusual weight balance adapts. Remember, by now your strengths and proficiencies are in place, this level is all about adaptation. Not to mention doing things you never thought you could possibly do! Practice, practice, practice till your body adapts to this one. Professional Moves Hugely built-up pain resilience and *insane* flexibility a must! * Ayasha * * Starfish * (Inanna with feet grips – fully extended legs, body and arms) - Pelvic floor like you won't believe, as well as leg strength and abs! * Jade * (Combination invert with high speed slide in inverted full split) – If you still cheat on your hand grips by using climber's chalk or resin or by roughing up the surface of the palms before performing a trick with wood planks or sand-paper, don't even bother trying this. You will first need to get past that as well as work up some decent calluses. Also, I'm afraid so, if you can't split, you can't do it. Try it with a contracted Showgirl finish while you wait for your splits to catch up with the rest of your proficiencies. We can certify you as a Master Instructor and send you to international competitions when you master this one! * Floating Lotus * - Armpit and hip pain resilience, as well as good splits work. * The Felix * (aka *The Spatchcock*, pretty much a *Starfish*, but a reverse-bow split grip) – You've all, by now, been taught the Splits Training Routine designed by Felix Cane...but, honestly, if you can pull this off what the hell are you doing at our school?! Or in South Africa?! Or on this continent?! ...Unless you're just getting back to your roots and, quite frankly, here to show off your World Champion trophy!!! Grips Assistance
[Taken from Vertical Horizons, Issue 1]
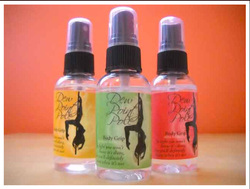
I'm sure each and every one of you have noticed the absolutely relentless heat wave blasting through our town recently...admittedly, some of us more than others. Our Peer To Peer interviewee this month can tell you aaaaall about the Advanced Class that never happened. Just *imagine*...a whole 45 minutes gone to waste (we made it through the advanced warm-up routines...barely!) solidly spent sliding off the pole instantly. Let me put it this way, we had an *excellent* class learning to impersonate Victoria Falls - for all the copious sweating going on! This experience was heart-breaking to say the least. You know how you all feel when you embark for a holiday and experience Pole Withdrawal? This was worse. This was having it right there...in your reach, the promise of pure elation...only you cannot grasp it. I won't be having this happening again! Ever! If you've been to our Facebook page [or properly browsed this section of our site], you've hopefully read through the notes, all containing helpful advice. In particular, I hope you've all read the one entitled “The Pole Dancer's A-Z of Essentials”. Whether you have or you haven't, allow me to recap “R” and “Z” for you [taken directly from our page]... R is for Resin – If you need to take the skid factor out of the floorwork for a specific routine, get a hold of some of this stuff. Upon procuring it, scatter it in a shallow box and give it a good stomping in the shoes you are going to perform in and you are totally ready to roll without any worries. PS. If you even think of using this stuff as a cheat for hand grips, see “Z”, you are guaranteed to need it!!! Z is for Zinc Cream – As aforementioned in “C”, you are going to get calluses, you need them and you want them. But be sure that, somewhere along the line, you will get carried away pulling off pole tricks for a prolonged period or will have to contend with a pole that others have gunked up with cheating (by rubbing their hands against rough surfaces to get a better grip or putting sticky substances on them for the same effect – don't worry, they'll suffer too for this). The result of either of these practices is that you will get blisters...and they will hurt like hell. Lather them in this stuff for a certifiable speedy recovery (but be warned, absorption time is slow. Also avoid letting it come in contact with fabric – it is a bit of work to get it out). When asked what her favourite product for helping her stick to the pole was, our Flying High interviewee of the month, Felix Cane, had this to say: “Blood and tears. No, I'm kidding. I am a very simple girl, good old rubbing alcohol will do for me. But it all really depends on your skin type and the climate. If you have oily skin and you live in a humid country you will need a magnesium or chalk based product to deodorize you and absorb extra moisture in the air and on the pole. on the other side of the spectrum if you are a super dry person (like me) you need to add moisture and tackiness.” So how does on go about this in such a way that it doesn't gunk up the pole for others and, if you're like Felix, what product can one use for a tackier grip without seeing you slide straight off the pole and into an injury? Ladies, I've done the research, and there are a number of professional products in South Africa that I am able to order for you if you need or would like to procure them. Remember, it is important to assess whether you have dry or oily skin, specifically on your hands and legs, before deciding which product is for you. Dew Point Price per Unit (piece): R205.00 Number pieces in packaging: 1 The Dew Point Pole Classic is available in 3 different formula levels. Light ~ Works well in humid climates and/or for people who have normal to oily skin. Medium ~ Works well in average to humid climates and/or for people with dry to normal skin. Ultra ~ Works well in dry to normal climates and/or for people with very dry to normal skin. Not sure which formula to choose? Take a peek at the Formula Guide below. Formula Guide How do I know which formula is right for me? The formulas are named based upon the amount of moisture they give, Light delivering the least amount and Ultra the highest. It also reacts to the environment you are in, making the climate a factor. You might want to try the Light if:
Many people opt to use 2 formulations. One for Winter when it is drier and one for summer when it is usually a bit more humid. There are also those that use one formula for when they are home and another formula to suit the climate of wherever it is they may be going for competitions / tours / performances. How does Dew Point work? When your skin is dry, holds are much more difficult to execute because your skin slides when you need it to stick. Dew point gives just the right amount of oil-free moisture to help your body grip the pole. So whether you are doing the Gemini or the Jade (handless invert in splits), your skin has what it needs. How is Dew Point different from other grip agents? First, it is designed to be used on the whole body, not just the hands. Second, it's a moisturizer, so you no longer have to choose between dry skin or the pole. Third, it feels different from any grip you have ever tried. It's not chalky, it's not messy and it's not sticky. Light enough that you can do still do spins with the greatest of ease, yet tacky enough that you'll be infintely more confident about inverts and handless grips. How do I use Dew Point? It's very easy to use. Simply spray it on, rub it in and allow it to dry (this will take 30 to 60 seconds depending on your climate). Then, go have fun on the pole! Admittedly, this professional, high-quality product has a high price tag to go with it... There are two other products that are commendable and will save you a penny or two. They are: Tite Grip Price per Unit (piece): R150.00 Number of pieces in packaging: 1 This is the product you've been waiting for! As every pole dancer already knows, one of the keys to success is maintaining your Grip. Tite-Grip is a non-slip antiperspirant hand lotion that dries clear and will not stain clothes. It can be used under a sports glove for Maximum non-slip grip. Lasts for 4 to 6 hours and lasts twice as long as other products. Loved by Pole Dancing Experts around the world. Mighty Grip Powder Price per Unit (piece): R130.00 Number of pieces in packaging: 1 Mighty Grip powder (none other than the awe-inspiring Pantera's product of choice) is a thermoplastic material that bonds to your hands or fingers creating a tacky grip that lasts for hours. Water and sweat resistant, but easily washed off with soap, Mighty Grip powder will not transfer to your clothing, equipment, or other surfaces. Improved grip increases control and reduces fatigue, slips. [If you are interested in any of these products please use the form in the Contact section of this site] |
The Pole Dancer's A - Z of Essentials

A is for Arnica (Ice or Oil) – This stuff is the staple diet of most Physical Theatre and Gymnastics practitioners, and should be yours too. You will pull something and you will get a bunch of “Badges of Honour” (that is to say, bruises), rubbing this magical stuff into the affected areas will shorten your period of suffering and provide real relief – it penetrates muscles. Consider it a high recommendation as well as a huge bonus to be able to pull this off in tandem with “S”, by the by.
B is for Baths (definitely of the hot variety!) – Climb into one after every class that was intensive for you or you'll regret it the next day for sure... C is for Calluses – Specifically, right at the mounds where the palm meets your fingers. You want them. You want them baaaaaaaaaad. Work your spins like your life depends on it, every chance you get, find a pole and do any spin you so choose. And keep at it till them mounds turn into respectable granite hills. If you wish to practice this form of dance for the long-haul, if you have your heart set on an Advanced Certificate, if you want to walk off a championship stage holding a trophy, these are the quintessential item on your list of essentials. Dedication – You will progress at a rate you will find deeply unsatisfying if you don't have it. This form of dance can be indefatigably, deeply rewarding and bring you unending elation if you're a dedicated student. You are wasting your own time and your money if you don't have an iota of dedication for your classes. E is for Eclectic Taste in Music – Pole is for everyone. Furthermore, we live in the rainbow nation and have wildly various personalities enrolling for classes...which we want you all to enjoy. This entails having a suitably variable playlist. You are thoroughly encouraged to bring songs you adore to add to it, but be gracious when others do the same. Even if the music that brings them joy might make you want to grind your teeth. You're all going through this together so bond over the experience rather than be narrow-minded about your musical preferences. F is for Foundation - Actually, most of us like to show off our “Badges of Honour” and compare notes when consulting The Pole Bruises Chart, but for those of you who want to show-off your legs (you get to worry about the upper body when you get to Advanced Level) during summer holidays and don't want people asking questions, better invest in some stay-fast cover-up. G is for Grip – Know how to manage your own - which means being aware of the climate, on the day you're wanting to get in pole time, and of the state of your skin (whether it's dry or clammy or oily and where) - and know how not to ruin it for others. That is to say, don't go touching anyone's pole if you've put on hand, face or body creams or oils, whether it's your own, a studio pole or even a pole at a club (where the only “dancing” happening on it generally includes gyrating around the thing or doing those pull-up pelvic thrusts). This is a matter of everyone's personal safety and not to be taken lightly. There is good reason indeed why it is demanded of all contenders at championships to not have applied such products at least 24hrs prior to the performance...and why, if you fail a random skin swab test, you will instantly be disqualified. H is for Hot Pants – Absolutely essential for Intermediate and Advanced students, you will be quite unable to pull handless grips and inverts without exchanging your usual work-out pants for these. I is for Inventiveness and Inspiration – Once you've climbed the ranks from being a humble beginner, that is to say, you've learned and mastered enough tricks to have an excellent understanding of how the physics of pole dancing works, these are yet more absolutely necessary essentials to have in your possession. They make your dance your own, rather than reproducible routines to run in classes, are guaranteed to help speed up your pole dancing prowess and ability and they also add a poignant element of delight to this discipline of dance [ - here's a special nod to Isabelle and Cindy :-) ]. For example, I'm currently composing a romantic (as opposed to raunchy) piece to perform for my partner on our 6th Anniversary. J is for Jewellery (should you or shouldn't you wear it?) - Surprisingly, yes you can. Just watch out for any item that might scratch the pole (and thereby your and your classmates if the gouge is deep enough). You by and large won't need to worry about abstaining from even rather chunky jewellery for performance or class time, such as bracelets and necklaces, although if you are new and inexperienced these might throw you off. the exception of certain piercings. Some are inclined to fall out and some can potentially cause a little pain depending on where they are and what move it is you are attempting. Any piercings above the neck are generally safe though and can remain in place. If you are pierced here and there and everywhere, please send your personal queries via the Contact mailing list, you're not the first we've dealt with and are able to give you surprisingly meaningful and accurate advice! K is for Karma – Get some by celebrating, not just your achievements, but those of your classmates. We all have to start at the bottom of the ladder and although not all of us may be fast climbers (excuse the pun) each step we take, however small, means y'all are going up. That's a real accomplishment and a joy - get in on it! Besides, even students who start slowly, through (D for) Dedication, can very suddenly and unexpectedly become high-flyers... you'd be surprised! Help each other up every step of your ladders with happiest cheers! [insert wild round of applause here!] L is for Love of Dance – Whether you have a long, certified history in dancing and make that jump *that much higher* because you love the music for the piece, or whether you simply have to tear up the dancefloor at a club because they're playing a song you can't possibly sit still to, or whether you just can't help but bob your head and tap your toes to the rhythm of a song you love being played on the radio while you're at your desk at work or home... Your level of skill does not matter. But if you do not feel any inclination to dance, if your body isn't even slightly pulled to movement by hearing melodies you love, I'm afraid these classes are not for you. M is for Metronomes – When you get to the level of being able to do full set-choreography pieces these babies will help you keep time for those inevitable bridge bars where the time key shifts when you're going over and memorizing the movements. N is for Natural Highs – You better be able to stomach these because when they hit you, when you've had a Breakthrough Moment with a trick, the high is quite impossible to ignore...and fantastic to revel in! O is for Open-mindedness – Presumably, you've got it if you've enrolled in the first place, but be sure to check your conscience if that really is the case. There is no disputing that this form of dance can do wonders for your self-esteem and fitness, whatever levels you might have them at, but you need to be open-minded when considering that, no matter what it means to you, pole dancing is still, by and large, perceived by the general public as equitable with stripping and sex work. You might know that not to be true, but the sad fact of the matter is that most people don't – tell these people about what the classes are like, or get them to attend an exam showing, it'll help encourage more open-mindedness like yours in society. P is for Patience – No matter how lengthy a dance history you might have, no matter how quick a study you may be, you will encounter a move that gives you a longer run for the money. Be patient, as long as you keep coming to classes or practising in your spare time, your Breakthrough Moment will come. Q is for Queries – Always be quick and never be shy to make your queries, whether during class or on our site or Facebook pages, they are absolutely invaluable. They help your progress rate and prevent you from getting unnecessarily hurt. Do not vex yourself worrying about whether your query might make you sound less than intelligent... anyone who would be so presumptuous and judgemental as to think that of you is the biggest idiot of all. Keep 'em coming!!! R is for Resin – If you need to take the skid factor out of the floorwork for a specific routine, get a hold of some of this stuff. Upon procuring it, scatter it in a shallow box and give it a good stomping in the shoes you are going to perform in and you are totally ready to roll without any worries. PS. If you even think of using this stuff as a cheat for hand grips, see “Z”, you are guaranteed to need it!!! S is for a Special Someone – No, not for showing off to and spicing up the bedroom (although those are definite perks!), but for soliciting regular massages from. And be sure to get them to use your Arnica (Oil or Ice) when they're at it. T is for Time – And there is never enough of it in the 21st century!!! But, if you are having a week from hell, if you are over-worked and over-stressed something awful, make the time to come to class and you will discover that that hour for you will go such a long way into making it all more manageable and bearable. I have three jobs including running these classes, the other two are very time-consuming and emotionally-taxing...and I swear these classes keep me sane. They offer release and rejuvenation like I've never had before and help me cope with my workload and prevent burn-out. Serotonin ladies, it's amazing what it can do!!! U is for Up-to-date – Keep coming to classes and visiting our website and Facebook page so you're up-to-date with helpful tips, advice and other documentation to maximise your enjoyment and proficiency in this form of dance. V is for Verve and Valiance – Your enthusiasm (verve) for dancing will give you valiance, that is to say, allow you to overcome your fears and accomplish tricks and movements in classes you never dreamed you'd be able to do! W is for Work-out Clothes – This ain't a strip club folks, this is a flat-out fitness trip that will make you sweat, and not in the sexy way, you can worry about modifying your Pole Dancing wardrobe to include specialised items and costumes when you reach the appropriate level (your instructor will inform you to do so) and, obviously, when entering Competitions and Championships. X is not for X-rays – They are quite unnecessary and to be avoided at all costs, don't get too experimental when there isn't an instructor or assistant instructor around to help you. If you happen to be at a dance club or bar where they have a pole, you can also avoid a trip to the radiologists by abstaining from the more funky moves if you've been indulging in alcohol (excluding, I honestly and nonchalantly must admit, The Fallen Angel...that landing will probably be harder to pull off though!). You will have plenty of time and opportunity to show-off when you get your Advanced Certificate or have an exam though. Y is for Yoga – You'll never get past Intermediate Level without the balance, control and stretches you get from this practice, each of these elements are absolutely essential. Z is for Zinc Cream – As aforementioned in “C”, you are going to get calluses, you need them and you want them. But be sure that, somewhere along the line, you will get carried away pulling off pole tricks for a prolonged period or will have to contend with a pole that others have gunked up with cheating (by rubbing their hands against rough surfaces to get a better grip or putting sticky substances on them for the same effect – don't worry, they'll suffer too for this). The result of either of these practices is that you will get open, weeping blisters on your hands...and they will hurt like hell. Lather them in this stuff for a certifiable speedy recovery (but be warned, absorption time is slow. Also avoid letting it come in contact with fabric – it is a bit of work to get it out). And there you have it! So get going and get all your A-Z's in stock ladies and gentlemen! Want a Pole of Your Very Own? - Pole Specs
Standard pole specs Material composing pole – Grade 316 (that is to say, polished!!!!!!!!) Stainless Steel. Ideally chrome. Don't buy into gimmick poles or poles made of the wrong material. Grade 304, unpolished stainless steel, is technically good enough, but you will need to spend a whole lot of time and trouble treating the steel to get it to the right quality...or else forget being able to perform a bunch of moves! Diameter – 38mm (championship and class diameter...although one can get away with 45mm. If it's 50mm, it's probably a gimmick pole or in a strip club!) Length – 3m. You can get away with cutting it down to 2.6m....but no less! Also, understand, this is a less than ideal length). Championship length is generally 6m. Performance circumference / platform space – Stand against a wall with your arms fully extended above your head (they absolutely must be straight!) with your fingers held straight and pointing upwards. Measure your length from the tip of the tallest finger to the floor, add 20cm and multiply by ∏ (pi = 3.14.....). Round up final result to be safe. Remember to allow at least 2/3 of this performative circumference at the top of the pole! [To be added to this article:]
The Pole Bruises Chart
Click on the image to enlarge.
All students are presented with their own hardcopy, however, if you are not with us, this poster is not copyrighted and you are welcome to save your own copy. 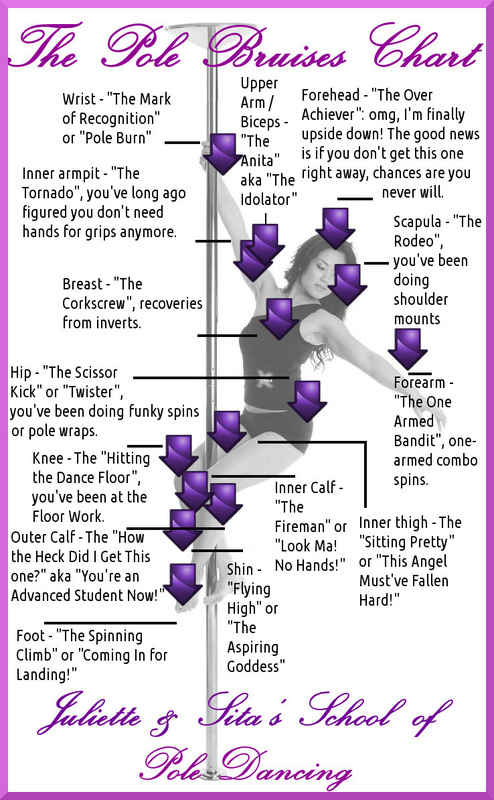
Why All the Pre-class Excercises?
The Importance of Warm-up in Pole Dance
Warming up is an essential part of any physical exercise or activity, so if you don't know your gluteus maximus from your radio-ulna then please read on. It is my hope that you will be able to glean meaningful information in this article to help you get the most from your Pole Dancing (whether for exercise or fun). Warming up should always take place before you start your training, work out or Pole Dance class. If you stop your activity while doing any of these and become cool then you should re-warm before resuming. So...What is a warm up? Warming up is exactly what it says on the tin, so to speak - warming up the body and mind in preparation for exercise or working out. This can be run on the pole or not in our discipline (and we have warm-up routines prepared for when we are able to provide more poles for classes – the PFA stipulates, for professional studios, a maximum of 3 students to a pole). Before I talk logistics, I want you to understand first why this is important. Warming up is not a bit of bending and stretching – and, while we are on this subject, please be aware that you should never stretch cold muscles (Advanced Students: which is why we run the Felix Splits Routine after the Advanced Sun Salutation and strength-building excercises!) The aim of a warm up and why we want to meet these aims To be properly, physically primed for our class or work out session at home we need to:
|
